Template Bank Manual
Table of Contents
The instructions below describe the procedures for generating template banks for O4.
NOTE: THESE INSTRUCTIONS ASSUME YOU HAVE A BUILT GWSCI CONTAINER POINTED TO BY ${GWSCI}
e.g.,
export GWSCI=/ligo/home/ligo.org/chad.hanna/manifold/gwsci-uber-dev/
Bank generation with manifold1
Useful background reading
- Method paper for manifold banks
- [O4 bank creation and test](Shio please fix this link)
In a new directory on an HTCondor enabled submit machine, first download the following two files
- https://git.ligo.org/chad-hanna/manifold/-/blob/main/examples/O4-bank-dag.yaml
- https://git.ligo.org/chad-hanna/manifold/-/blob/main/examples/O4_projected_psds.xml.gz
Then do the following:
$ singularity exec ${GWSCI} manifold_cbc_bank_dag --singularity-image ${GWSCI} O4-bank-dag.yaml
$ condor_submit_dag  manifold_cbc_bank.dag
When the dag is finished you will have a bank file called: H1L1V1-O4_MANIFOLD_BANK-0-2000000000.h5
This workflow will also produce a bank simulation and you can see the result in: test.png
It should look like this
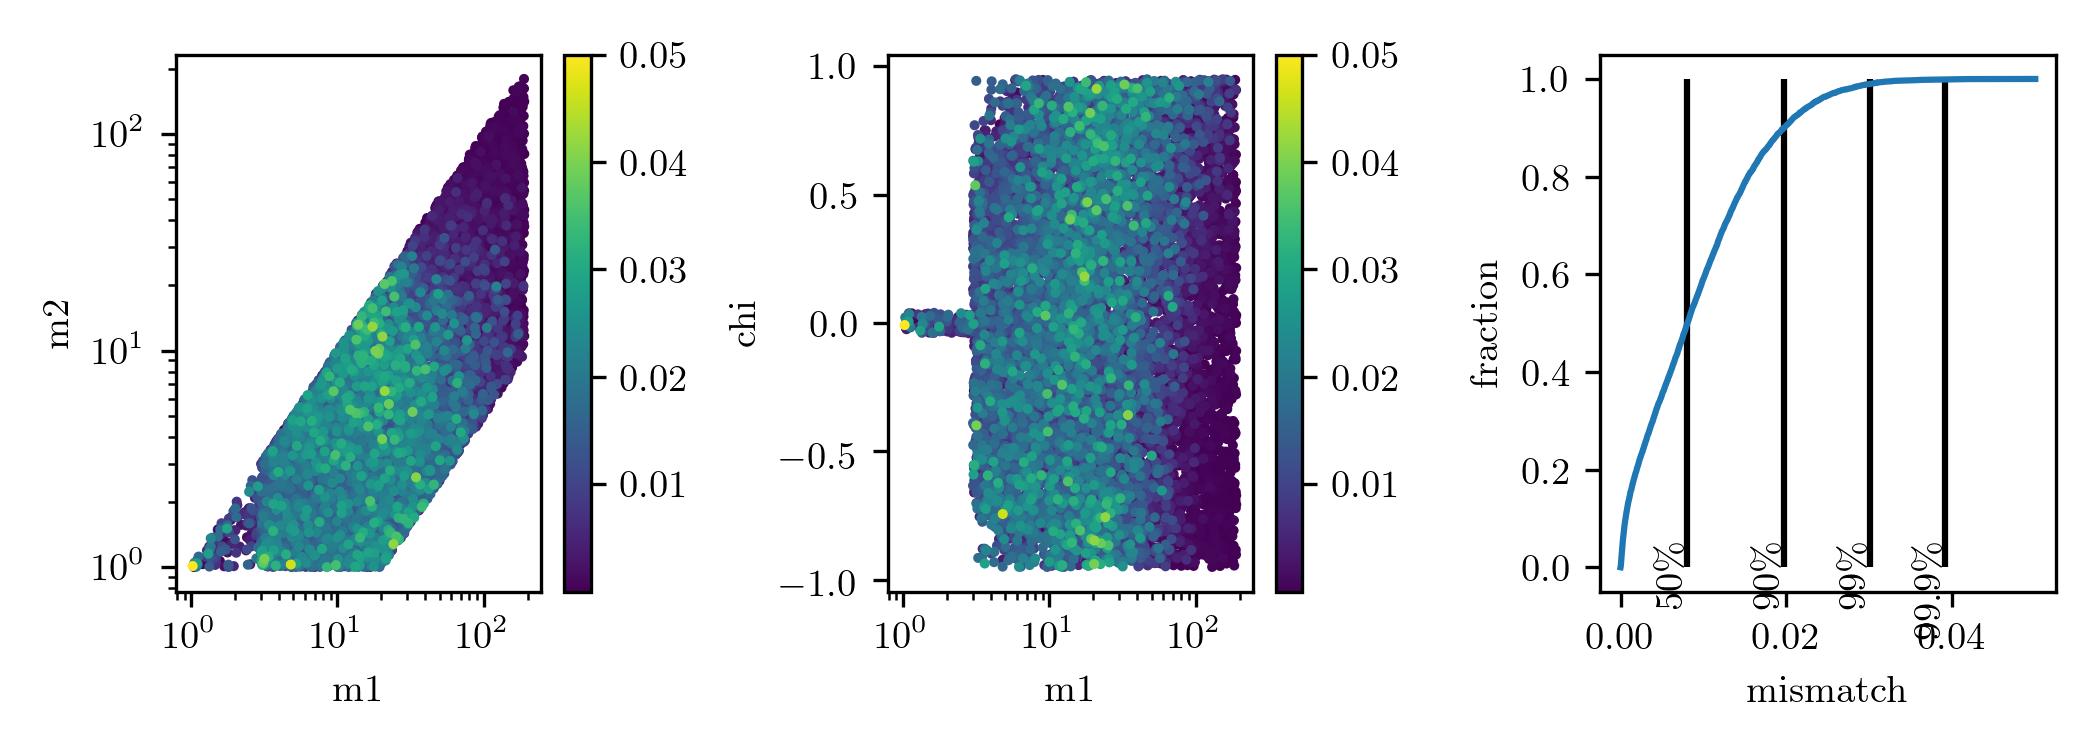
O4 Manifold bank simulation: 90% of the bank has matches greater than 98%. 99% of the bank has matches greater than 97% and 99.9% of the bank has matches greater than 96%.
If you want to convert the bank to XML to use in a gstlal inspiral analysis, you can do something like this:
singularity exec ${GWSCI} manifold_cbc_bank_to_xml --output-xml H1L1V1-O4_MANIFOLD_BANK-0-2000000000.xml.gz H1L1V1-O4_MANIFOLD_BANK-0-2000000000.h5
Population model generation with manifold
Start by making a new directory and copying the bank file from the previous step: H1L1V1-O4_MANIFOLD_BANK-0-2000000000.h5
Then do:
  $ singularity exec ${GWSCI} manifold_cbc_bank_mass_model_dag --output-h5 H1L1V1-O4_MANIFOLD_BANK_SALPETER-0-2000000000.h5 --bank-file H1L1V1-O4_MANIFOLD_BANK-0-2000000000.h5 --singularity-image ${GWSCI}
  $ condor_submit_dag manifold_cbc_bank_mass_model.dag
The mass model file will be called H1L1V1-O4_MANIFOLD_BANK_SALPETER-0-2000000000.h5
If you want to plot it you can do
$ singularity exec ${GWSCI} manifold_cbc_bank_plot_mass_model H1L1V1-O4_MANIFOLD_BANK_SALPETER-0-2000000000.h5
It should look like this:
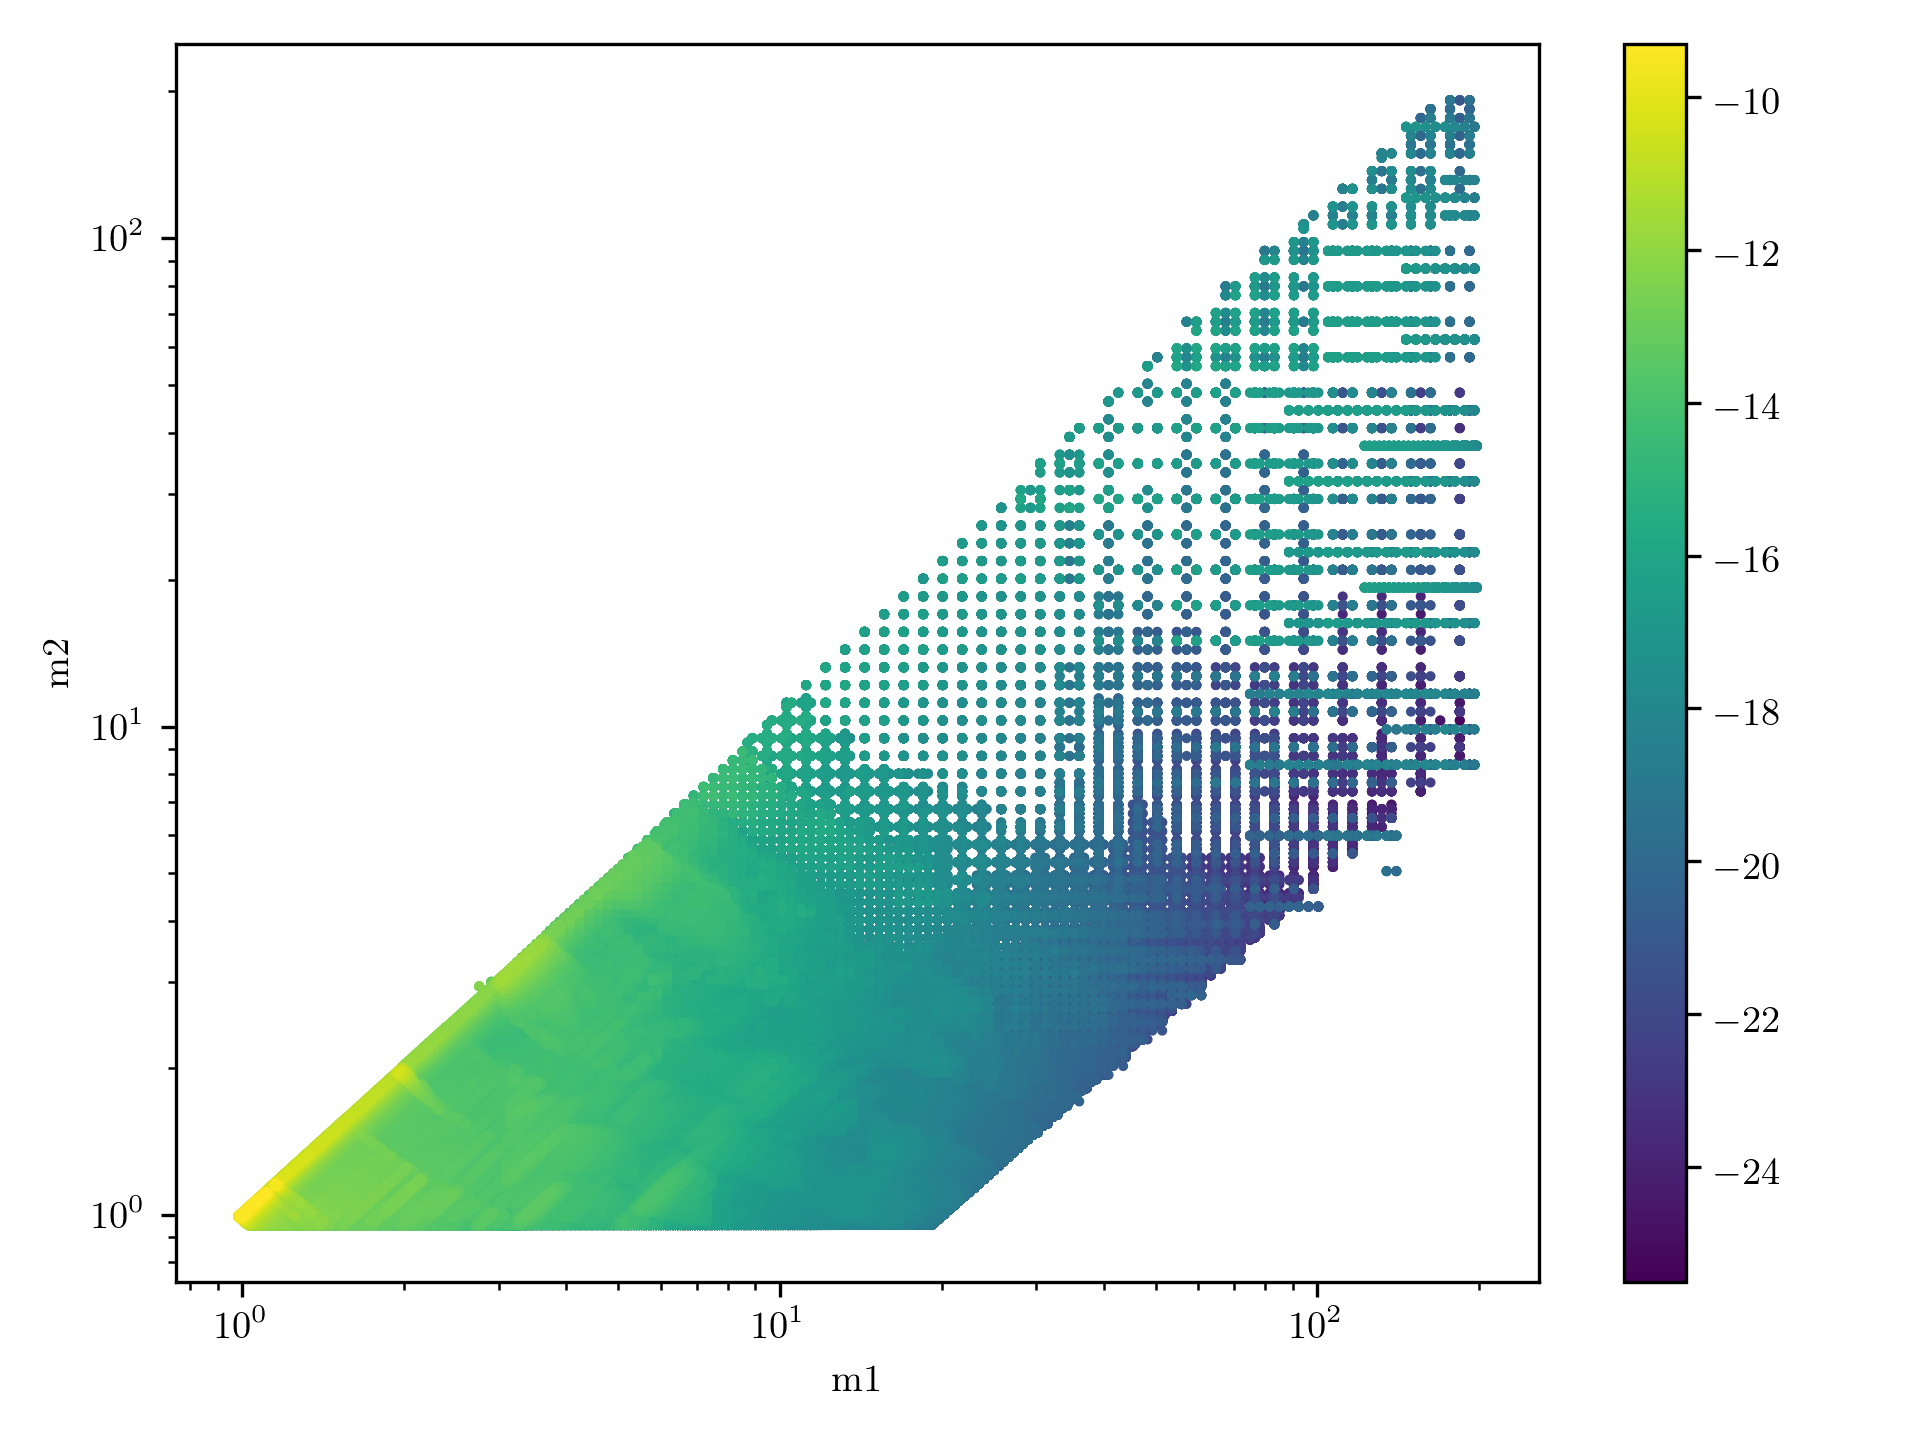
O4 Manifold bank population model: The mass model is a salpeter IMF evaluated at SNR 10.
Bank simulation with sbank
The bank simulation checks how good the generated template bank is by using injections.
In the working directory, have config.ini (a bank sim config file), env.sh,
<name-of-template-bank.xml.gz>, and <reference-psd.xml.gz>.
Using a python2 build, run
gstlal_ilwdify <name-of-template-bank.xml.gz>
Edit config.ini to get the configuration one needs. When running a bank sim for a bank that spans parameter spaces that cover multiple source regions (BNS, NSBH, BBH), the config.ini should have multiple injection sets.
Run
  ligo-proxy-init albert.einstein
  source env.sh
  conda activate igwn-py37
  source env.sh
  lalapps_cbc_sbank_sim_pipe --config-file config.ini --condor-command accounting_group={APPROPRIATE_ACCOUNTING_GROUP_NAME} --condor-command accounting_group_user=albert.einstein
In each of the generated .sub files, make sure the appropriate versions of
accounting_group and accounting_group_user are added.
Submit a DAG with:
   condor_submit_dag SBANK.dag
   condor deactivate
Monitor the DAG with:
tail -f SBANK.dag.dagman.out
The output files are png files.\
Copy the output files to ~/public_html/ to see the results.
Remaking a new PSD from the DCC
NOTE: You can probably skip this step and use the already processed PSD file in the manifold repo unless you are doing something custom
Get the ASD representative of O4 expectations from here.
For each detector (LIGO, VIRGO, KAGRA), run the following command where {DET} is aligo_O4high,
avirgo_O4high_NEW, and kagra_80Mpc.
wget https://dcc.ligo.org/public/0165/T2000012/001/{DET}.txt
Get a PSD xml file from a ASD txt file with gstlal_psd_xml_from_asd_txt.
Here, {IFO} is H1, L1, V1, and K1.
gstlal_psd_xml_from_asd_txt --instrument={IFO} --output {DET}_{IFO}.xml.gz {DET}.txt
Combine the individual PSD xml files into one PSD xml file
ligolw_add --output O4_psd_HLVK.xml.gz *.xml.gz
Notes:
In config.ini, use m-distr = log to see the behavior in low-mass better.\
In config.ini, adjust the numbers assigned to injections-per-job and jobs.
The total number of injections per injection xml will be injections-per-job
times jobs.
Template banks and mass models can be found in the dcc. To download the files in the DCC, run the following:
  conda activate igwn
  dcc archive --archive-dir=. --files --interactive T2200318-v2
  conda deactivate
T2200318-v2 should be replaced by the DCC number when downloading from other
DCC pages.
-
Some hints about bank files:
The PSD is source from here: https://dcc.ligo.org/LIGO-T2000012/public
Get the number of templates by running:
ligolw_print -t sngl_inspiral -c mass1 <name-of-template-bank-file.xml.gz> | wc -lConvert the xml file to a sqlite file with
ligolw_sqlite.ligolw_sqlite <name-of-template-bank-file.xml.gz> -d <name-of-template-bank-file.sqlite>Query the generated template bank file with sqlite by running:
sqlite3 <name-of-template-bank-file.sqlite>Example: To compute the number of templates in the BNS region, run:
select count(mass1) from sngl_inspiral where mass1 <= 3 and mass2 <= 3;For errors saying “invalid type ‘ilwd:char’ for Column ‘event_id’ in Table ‘sngl_inspiral’, expected type ‘int_8s’”,
ligolw_no_ilwdchar <name-of-file.xml.gz>For errors where the injection xml file has entries as
ilwd:charbut the bank only hasint_8s, run the following:↩︎gstlal_ilwdify <name-of-file.xml.gz>